ExCap dev log #1: two weeks, four design rounds and a cap that counts vape puffs
ExCap is a tiny Bluetooth cap that clips onto a vape and logs every puff to the ExHale app. These are the first two weeks: measuring a vape from photos, feeling a puff with a pressure sensor, one shape for every vape, and the print that didn't fit.
Day 1. The starting material is a pile of photos: one vape, shot from every angle, with an AirPods case lying beside it for scale. The brief is short: "a small Bluetooth device that you attach to your vape mouthpiece" and that logs puffs to the app automatically. It has to be "low profile", "fit on any vape", sit well in a pocket, run on a tiny battery, with "USB-C charging if possible". The only fabrication tool on hand is a desktop 3D printer, so every design has to be printable.
Twelve days later the hardware repo held four design rounds. A puff detector with 93 passing checks. A Bluetooth contract, a KiCad schematic, a gate that refuses to export unprintable plastic, and one 3D print that flatly refused to go on the vape. This is the dev log of those first two weeks: how we started building ExCap, a smart vape cap that counts vape puffs automatically, and an honest list of what we still don't know.
- Days, first photo to no-support redesign
- 12
- Design rounds
- 4
- Puff detector checks passing
- 93
- Parts ordered so far
- 0
Why count vape puffs automatically#
ExHale is a quit vaping app where every puff costs your pixel buddy a little HP. That only works if puffs get logged, and today logging means you: a tap in the app, a tap on the widget, a tap on your watch. It works. It also asks you to stay perfectly mindful of a habit that runs on autopilot.
We have already attacked that from the wrist. Vape Sense (BETA) uses an Apple Watch's accelerometer to notice the shape of a vaping session, the hand rising to the mouth again and again, and suggests it for you to confirm. It needs nothing on the vape at all. What it can't do is feel the puff itself.
ExCap goes to the source. It sits on the vape, in the air path, and is designed to register every single draw as it happens: when it started, how long it lasted, how hard you pulled. The two are complementary. The watch notices sessions with nothing to carry; the cap counts puffs, one by one, on the vape it's clipped to. Together they make a vaping habit tracker you barely have to touch.
The app side is planned, not built. A puff from the cap will land in the same puff log as a tap, marked as coming from the device. If you tap as well, the app's existing merge logic pairs the two: within 5 seconds it treats them as the same puff, and within 20 seconds it asks you.
Twelve days: from a pile of photos to a printable collar
- Days
- 12
- Commits
- 29
- Design rounds
- 4
- Busiest day
- Day 10 6 commits
Commits per day
Brief and v0
From a one-paragraph ask to a working v0 design in three days.
- Day 1
BriefThe brief, and a vape measured from photos
The ask: a tiny Bluetooth cap that logs puffs on its own. Photos next to an AirPods Pro case set the scale.
- Day 2
BriefBluetooth contract and PuffPacket notes
Pinned the data contract the app will speak, plus build decisions and notes from the PuffPacket paper (CHI 2020).
- Day 3
v0Puff tracker v0
CAD and a fit test, a parts list, firmware with a puff detector, a Web Bluetooth test page and an app plan, in one commit.
Site and round 2
A device page, a name, and a much smaller Cap.
- Day 4
SiteDevice page mockup
Waitlist and ordering states, a 3D CAD viewer with a snap-on animation, and exclusive rewards.
- Day 4
SiteA quest log on the page
Added an Engineer the electronics step; the fit test became Testing.
- Day 5
R2It gets a name: ExCap
Renamed everywhere, Bluetooth name included. Round 2 starts: the tiny Cap, a swappable tip insert and a custom board spec.
- Day 5
SiteElectronics in the 3D viewer
v0's board, pressure sensor, cell, wires, gasket and screws in the exploded view, with callouts.
- Day 5
R2A video kit for round 2
Per-material 3D files of the Cap in one frame, with click-on facts.
- Day 5
R2Alternate inserts
A flat PETG insert and a TPU one, both shown seated.
- Day 6
R2.1Side pod and pocket-proof Cap
A pod that slides on (+5.2 mm over the tip) and a rounded Cap that twists on (+6.2 mm), with snag checks and print dummies.
Round 3
Three reference vapes, one shape that fits them all.
- Day 7
R3Three reference vapes
The wedge-shaped disposable, a 24 mm round and a 40 x 26 box, all with the same tip, plus a shared clash and pocket-snag check.
- Day 7
R3Round 2.1, scored
The pod and the Cap both fail on the 24 mm round vape.
- Day 8
R3Three new concepts
Mushroom (22 mm, no room for the motor), collar (24 mm, motor inside, one insert for all three) and pod3 (per-vape seats). Plus haptics and blocking research.
- Day 8
R3Collar fix round
A 7 mm coin motor inside, trimmed to 23.4 mm (0.3 mm inside the round vape), thinner lid, motor 1.16 mm from the antenna half. First hero render.
- Day 8
R3The collar is the pick
One 23.4 mm puck for all three vapes, +4.4 mm over the tip, motor inside.
Board and the 25.4 mm variant
A custom board, USB-C on the device and the shutter.
- Day 9
BoardRound 3 parts list
Breadboard rig, print materials, custom board parts with supplier links and fab fees, the cell, magnets, a dock and tools.
- Day 9
CollarFirst shutter, plus mount detect
An optional variant: a printed TPU plate that two shape-memory wires move over the airway, and a switch that knows when ExCap is on a vape. Off by default.
- Day 9
BoardCustom board brief
Outline, keep-outs, the circuit, connectors instead of solder where possible, fab rules and cited datasheets.
- Day 10
BoardElectromagnet shutter drive
A driver on the board for a tiny coil that flips the shutter, plus the J1 connector pinout and a naming contract for footprints.
- Day 10
BoardUSB-C on the device
Plain USB-C on the device beats a dock or an off-the-shelf magnetic standard: nothing extra to carry or lose. Charging research notes.
- Day 10
CollarCleanable, no glue
A wet/dry split you can rinse, a vent disc over the sensor port, a side-push mount switch. Shutter and USB-C don't fit at 23.4 mm.
- Day 10
BoardThe 25.4 mm call
Grow the collar to 25.4 mm for USB-C on the device and the electromagnet shutter; a 10-pin J1; the side-push switch.
- Day 10
BoardSchematic: ERC clean
KiCad schematic with a GPIO map and parts, plus ExCap's footprint library.
- Day 10
BoardPhase 2 deltas
From the schematic review: J1 gains VBUS, the dock pads go, an extra 4.7 uF on the radio's supply.
Reality checks
The first print didn't fit. Then the printer's rules caught up with us.
- Day 11
FitToo tight: a tip gauge
The first collar print was far too tight; the tip size was a photo estimate. Printed slot bars now measure the real tip.
- Day 11
CollarCollar 25.4 mm
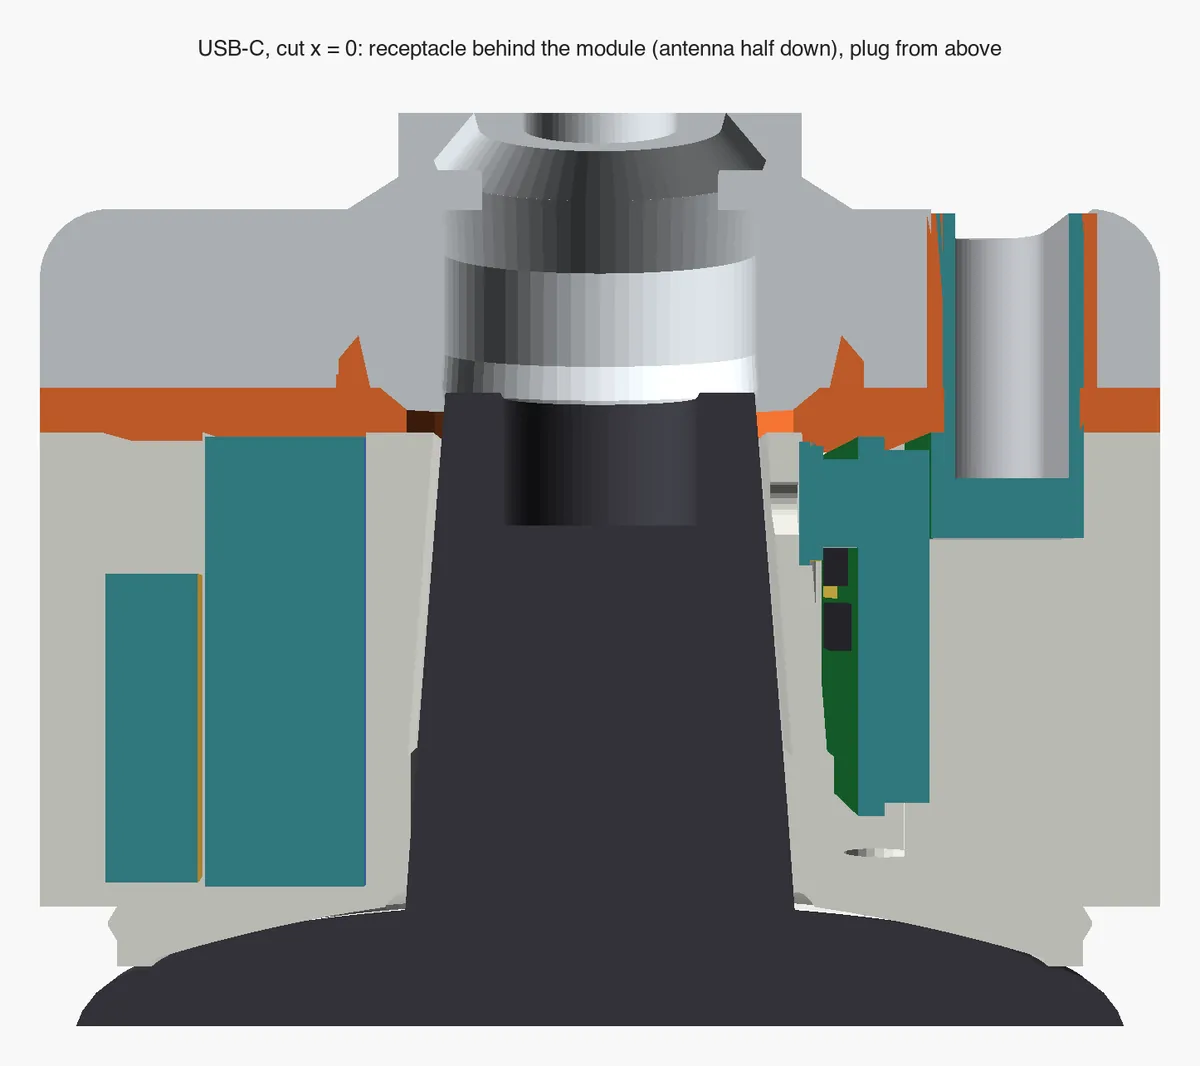
USB-C on the device, plug from above; the electromagnet shutter; motor moved behind the cell. The insert becomes a slip fit with a fit knob and a 5-step ladder.
- Day 11
FitS/M/L size ladder
Tip +0, +0.2 and +0.4 mm a side, each with two insert fits. For fit tests only.
- Day 12
Fitprintcheck.py
The 25.4 mm parts had overhangs FDM can't print without supports. A gate now fails the build: nothing flatter than 45 degrees unless it's a bridge of 6 mm or less.
- Day 12
CollarNo-support redesign
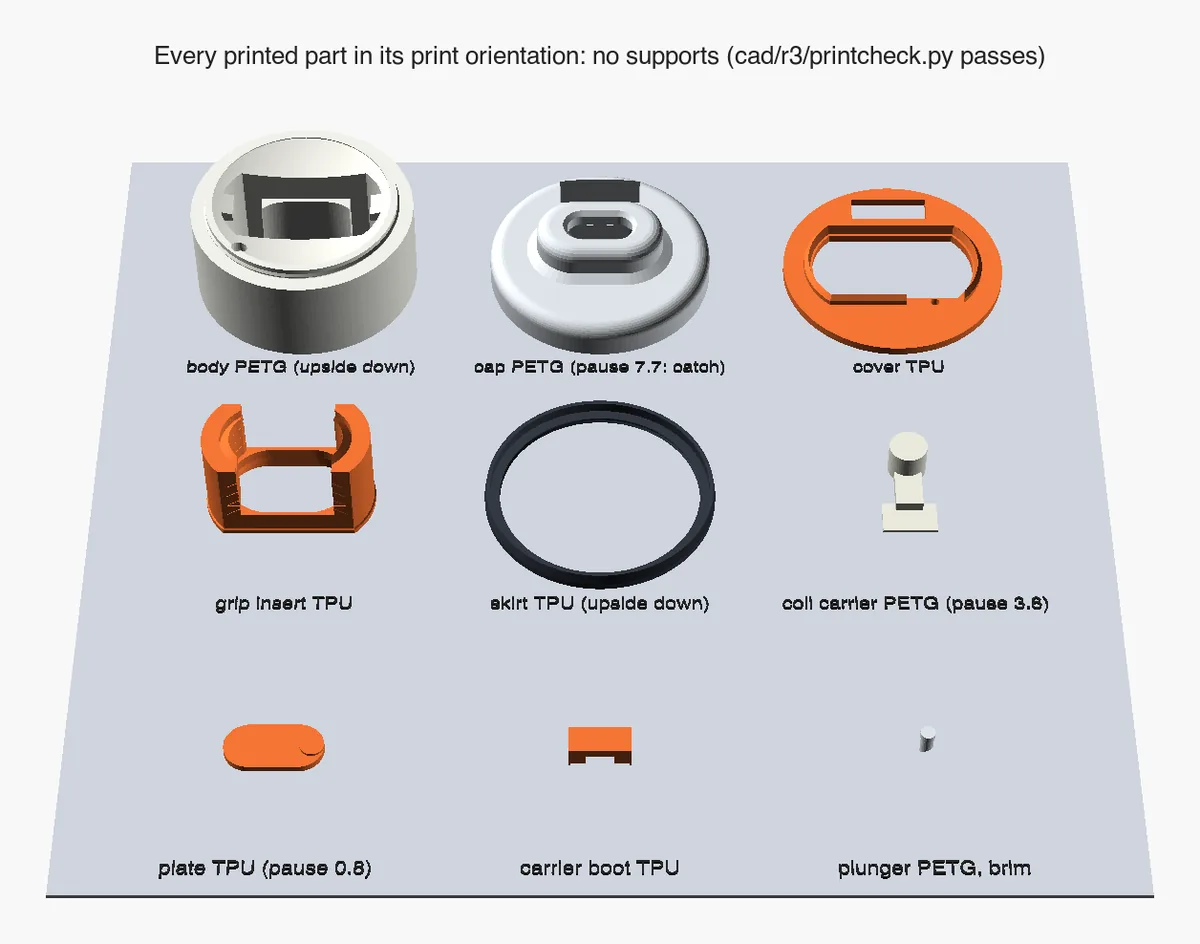
Flat-on-bed body and cap, 40 to 45 degree roofs, 42 degree fins, one part fewer, and the gate in every build.
Day 12 and counting
Measuring a vape you can't hold#
We never touched the vape. Everything started from photos: a wedge-shaped disposable shot straight down while lying next to an AirPods Pro 3 case, straight down onto its top cap while standing, and a few oblique angles for shape. The case is the ruler. It measures 47.2 x 62.2 x 21.8 mm, and in the best overhead shot its two sides agree on the scale within 1.5 percent, about 14.6 pixels per millimetre at full resolution.
There was one trap. In the shots looking down onto the standing vape, the top cap is about 95 mm closer to the camera than the desk, so it looks bigger than it is. Scale from the case there and every number comes out wrong. So those shots were scaled from the cap's own 40 mm length instead.
The estimates that came out of it:
- body: 40.4 mm wide;
- top cap: a rounded wedge, 40 mm long, about 26 mm thick at the mouthpiece end and 13 mm at the other;
- mouthpiece tip: a flattened oval, 12.7 x 8.5 mm (give or take 0.7 and 1.5 mm), standing 13 mm above the cap on a clear dome about 20 mm across.
Those error bars are the whole story of the second week, so here it is up front. Photos are good to 1 or 2 millimetres. A soft sleeve that grips a tip and seals the air around it needs about 0.2. The plan said as much from the first commit: measure properly before printing anything big. Hold that thought. It comes back on day 11.
Photos are good to 1 or 2 millimetres. A seal that grips a tip needs about 0.2.
Feeling a puff: pressure sensor puff detection#
Most vapes fire from a little pressure switch in their own air channel. When you draw, the air path drops below room pressure and the heater wakes up. That drop is the cleanest puff signal there is, and it is big. PuffPacket, a 2020 research platform for tracking e-cigarette use, measured human draws at about 30 mbar, or 3 kPa.1 Compare that with the background. A slammed door or a passing car typically moves room pressure by tens of pascals (a car door can manage a few hundred), and only for a fraction of a second. Stairs and lifts drift it by about 12 Pa per metre, slowly. The signal is roughly a hundred times the noise.
PuffPacket itself listened to the vape's electrics instead: a probe between a pod and its device read the heater's voltage, or a sensor soldered into a drilled-open device read its current.1,2 That's a fine choice for a lab. A sealed disposable has no contacts you can reach without cutting it open, so we went for the air path. It is non-invasive, and it works the same on every mouthpiece.
The price is that you draw through ExCap's own mouthpiece. A soft TPU insert seals onto the tip, so the vape's draw switch still feels the suction and fires as normal, while a pressure sensor beside the channel feels the same drop. The sensor sits on a side port, out of the stream, because condensed e-liquid is sticky and conductive. Later rounds add a breathable ePTFE membrane over the port.
The detector, in plain words
Everything starts from one number: how far the pressure sits below a slowly moving baseline.
- Baseline. At rest it follows the pressure with a one-second average plus a trend term, so weather, stairs and lifts leave
devnear zero. During any excursion it freezes. - Arm, then confirm. Past -30 Pa the detector arms, and the drop must then reach -120 Pa within 500 ms. Real draws get there in a few tens of milliseconds. If it doesn't, the change was drift: the baseline snaps to the new pressure. That is what keeps a fast lift ride from counting.
- Start and end are where
devcrosses -60 Pa, so the stricter check doesn't shorten the measured duration. - Rejects. Under 250 ms is a blip, and anything that never reaches -120 Pa (a door, a car) is ignored. Blowing pushes the pressure up, which freezes the baseline too, so a blow can't fake a puff when it stops.
- Merge. A drop that returns within 300 ms of recovering is the same puff. Draws over 10 seconds are cut and flagged.
Each puff becomes a 16-byte record: a sequence number, a start time, the duration, and the peak and mean pressure drop, which together are a rough proxy for how much you drew.
PuffScope: the firmware's puff detector, running in your browser
A 70 second synthetic pressure trace at 25 Hz with labelled events: puff at 3 s, door at 8 s, puff at 12 s, blow at 17 s, lift at 22 s, puff at 36 s, double at 58 s. The plot shows pressure minus the detector's baseline in pascals on a log-like scale, the start and end thresholds, the detected puffs shaded, a lane with the detector state over time, and absolute pressure with the baseline tracking the lift. With start 120 Pa, end 60 Pa and minimum 250 ms: Puffs found: 4 of 4 real puffs. Rejected: door, blow, lift. Use the left and right arrow keys to move the cursor, shift for bigger steps, Escape to clear.
- time
- -
- minus baseline
- -
- state
- -
- baseline
- -
Hover, drag or focus the plot and use the arrow keys to read the trace.
v0 in three days: an nRF52840 puff tracker#
On day 2, before a line of firmware existed, the Bluetooth contract was pinned: every service, every byte offset, and a table of golden vectors, exact byte strings that the firmware, the test tools and the future app all have to reproduce. Contracts first means three pieces can be built in parallel and still click together. On day 3, v0 landed in one commit: CAD and a fit test, a parts list, firmware, a test page and a plan for the app.
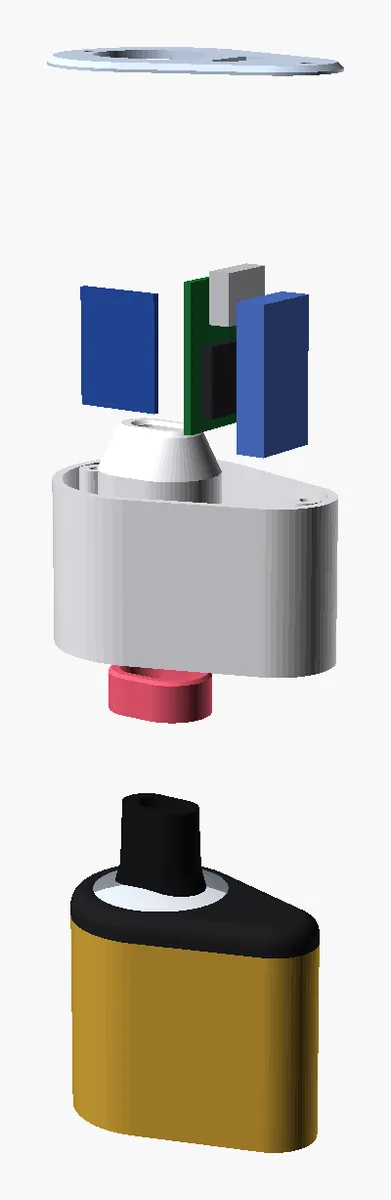
The v0 hardware is deliberately boring, so nothing waits on a custom board. A Seeed XIAO nRF52840, a thumbnail-sized board with Bluetooth 5, USB-C and a LiPo charger built in,3 built around Nordic's nRF52840 chip;4 a BMP280-class pressure sensor on a small breakout;5 and a small protected LiPo cell, all wired by hand.
- Firmware. Four sensor families (BMP280, BMP388/390, LPS22HB/HH and MS5837-02BA), picked with one line of config. It samples at 25 Hz and sleeps in between.
- Storage. A ring buffer of 2,048 puffs, about two weeks at 150 a day, so the phone can stay away and nothing is lost. The device counts from boot; the phone sets the time on connect, and stored puffs are converted.
- Bluetooth. A custom GATT service (Status, Puff Record, Control, and Live, a raw pressure stream for calibration) beside the standard Battery and Device Information services. A sync sets the time, asks for everything since the last puff the phone has, and acknowledges it so the device can free the space.
The firmware's host tests run 93 checks under clang++, all passing: every golden vector byte for byte, a 1.4-second puff at -3 kPa with noise, door slams, puffs taken inside moving lifts, a 20-second blow, a draw long enough to truncate, and a log that wraps past 2,048. A plain HTML Web Bluetooth test page connects from Chrome, runs the sync and draws live pressure; its protocol code passes 21 tests.
The device got its name on day 5: ExCap. That same week the website gained an ExCap page with a waitlist. And to be clear about what all of this is: code that compiles and passes on a laptop. None of it has run on a real board yet.
From one vape to every vape#
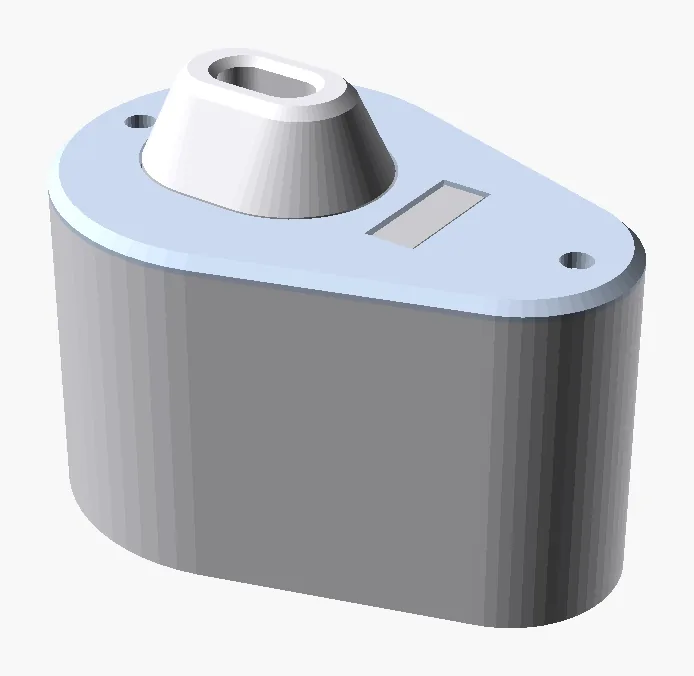
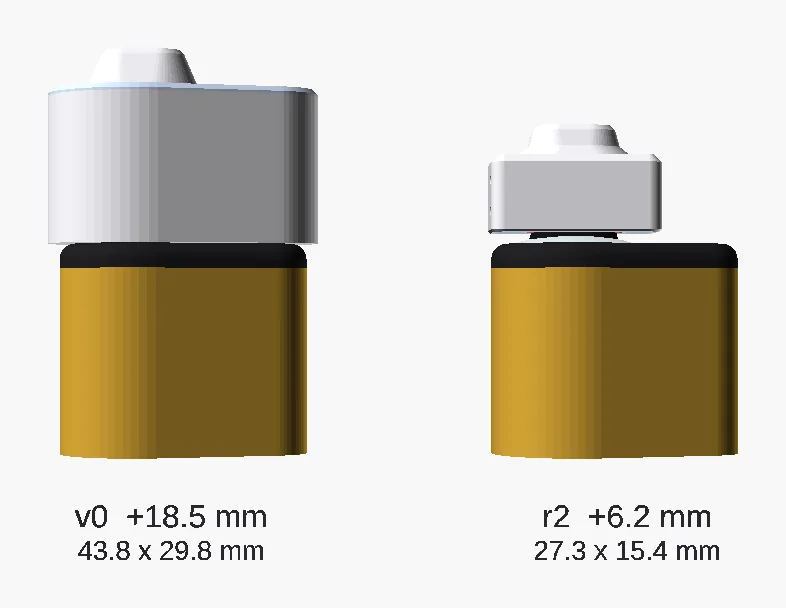
v0 worked on paper and failed the first line of the brief. It spread over the whole top cap, 43.8 x 29.8 mm, and added 18.5 mm above the tip: not low profile, and not something you forget is in your pocket. Off-the-shelf boards buy speed, and they cost size.
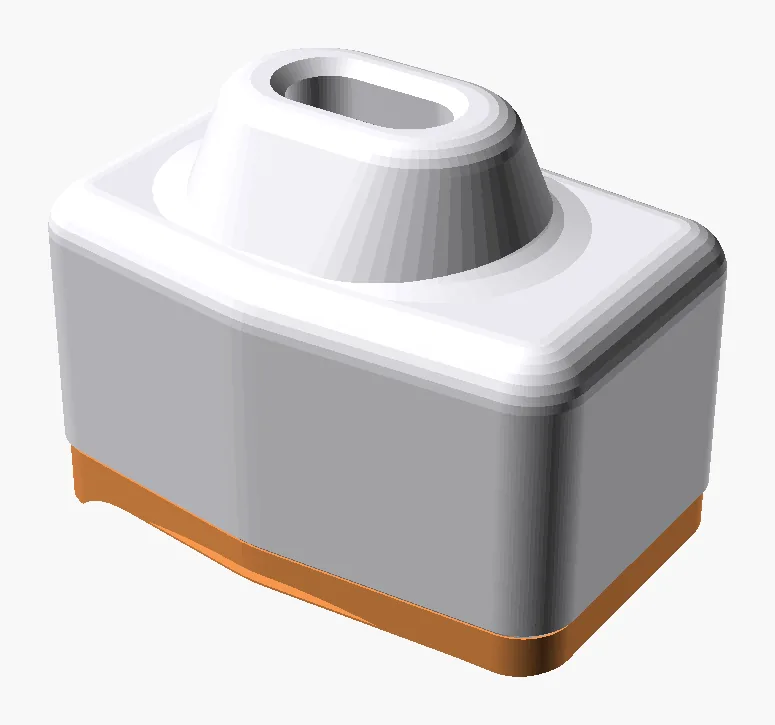
Round 2 (day 5) answered with the Cap: one small body that replaces the mouthpiece and clicks onto a soft insert on the tip. A custom 12.4 x 10 mm board stands at one end and a 30 mAh-class cell at the other. On the wedge-shaped disposable it measured 27.3 x 15.4 mm in plan and added 6.2 mm over the tip. It touches the vape only through the insert, so a different vape means a new printed insert, not a new device.
Round 2.1 (day 6) went after the next failure mode. A side pod suits this style of vape, and anything that stands up over the tip can catch on pocket fabric and get pulled off. So we drew both. A side pod held by a sliding latch, 30.0 x 14.2 mm and +5.2 mm, staying 0.21 mm inside the cap's outline everywhere. And a pocket-proof Cap with a twist lock (push, turn 30 degrees, click), +6.2 mm, rounded so fabric has nothing to grab.
Every round, as rendered
Day 3 Off-the-shelf parts in a printed housing with its own mouthpiece. It added 18.5 mm to the vape.
Day 5 Renamed ExCap. A custom board lets the whole thing shrink into a Cap with a swappable tip insert.
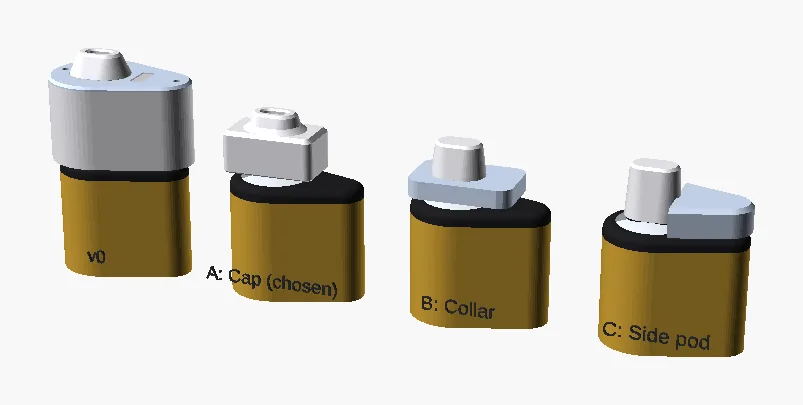
Day 6 Two shapes built to survive a pocket, with snag checks and print dummies.
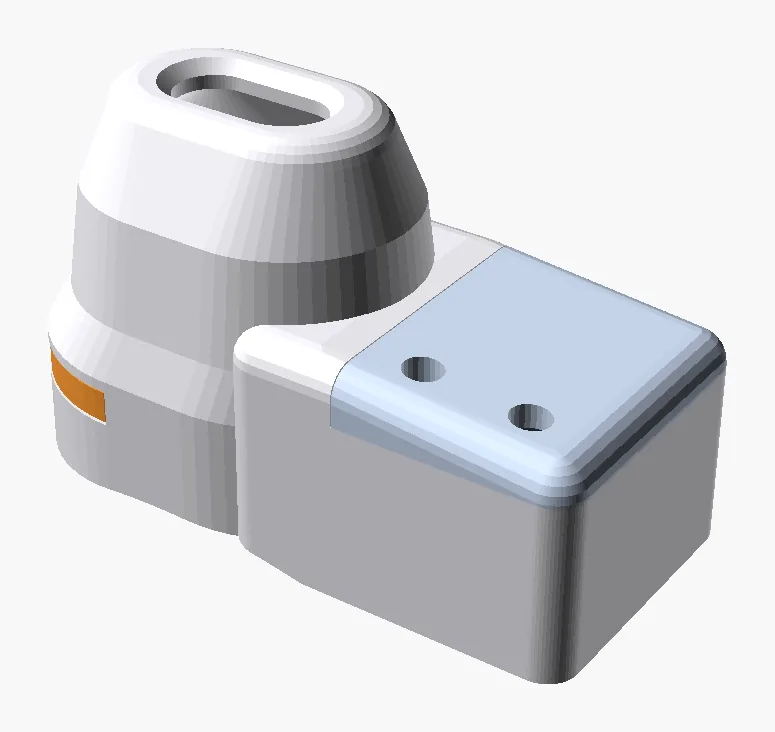
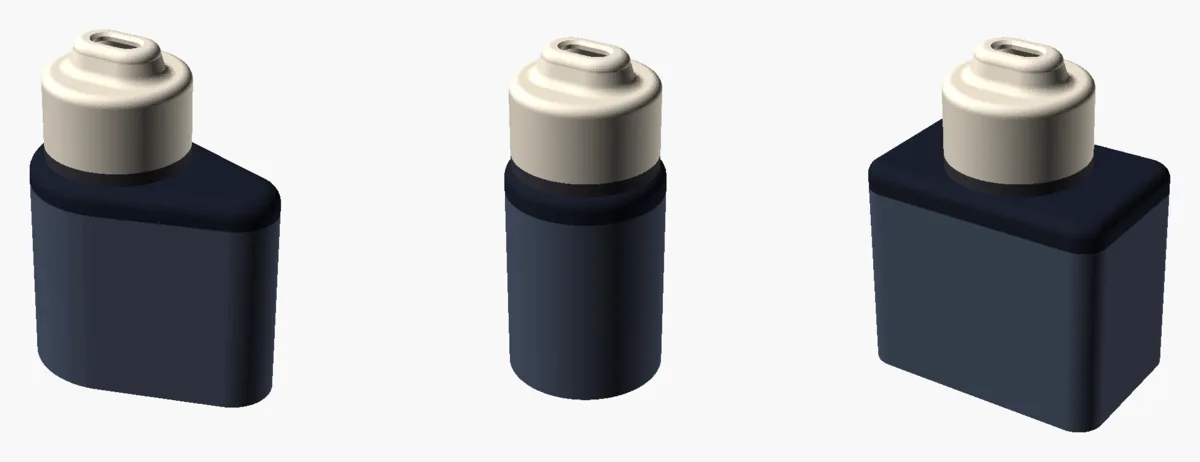
Day 8 Three reference vapes with the same tip. A 24 mm circle round the tip fits inside all three tops.
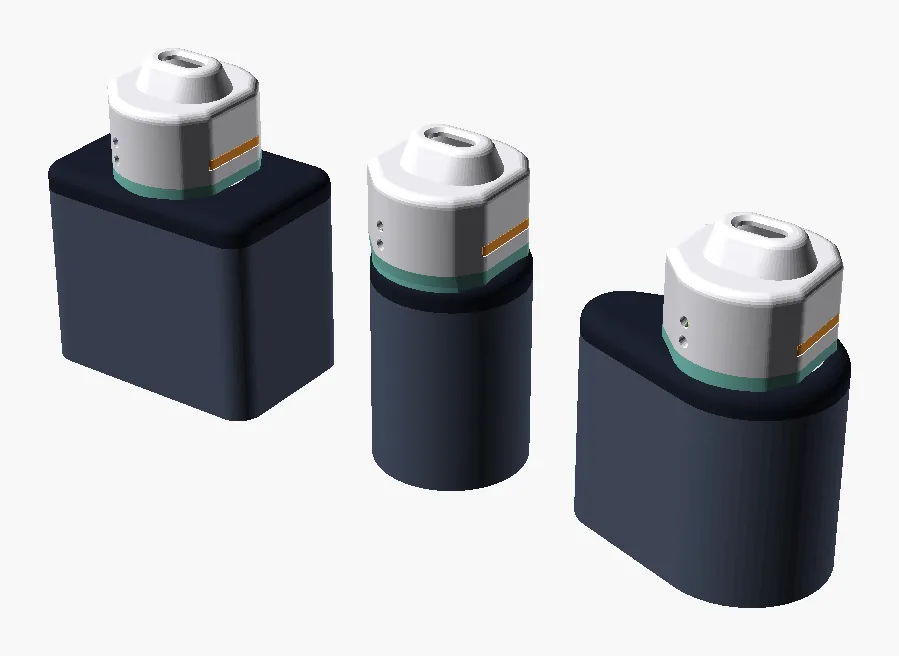
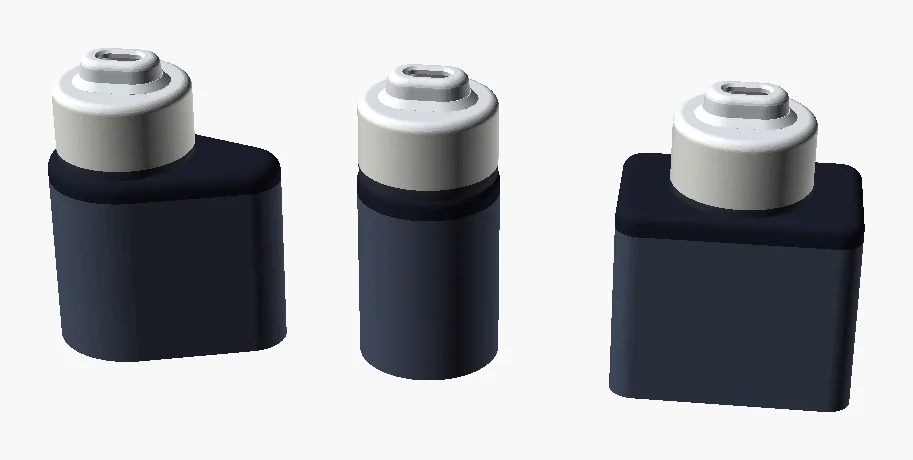
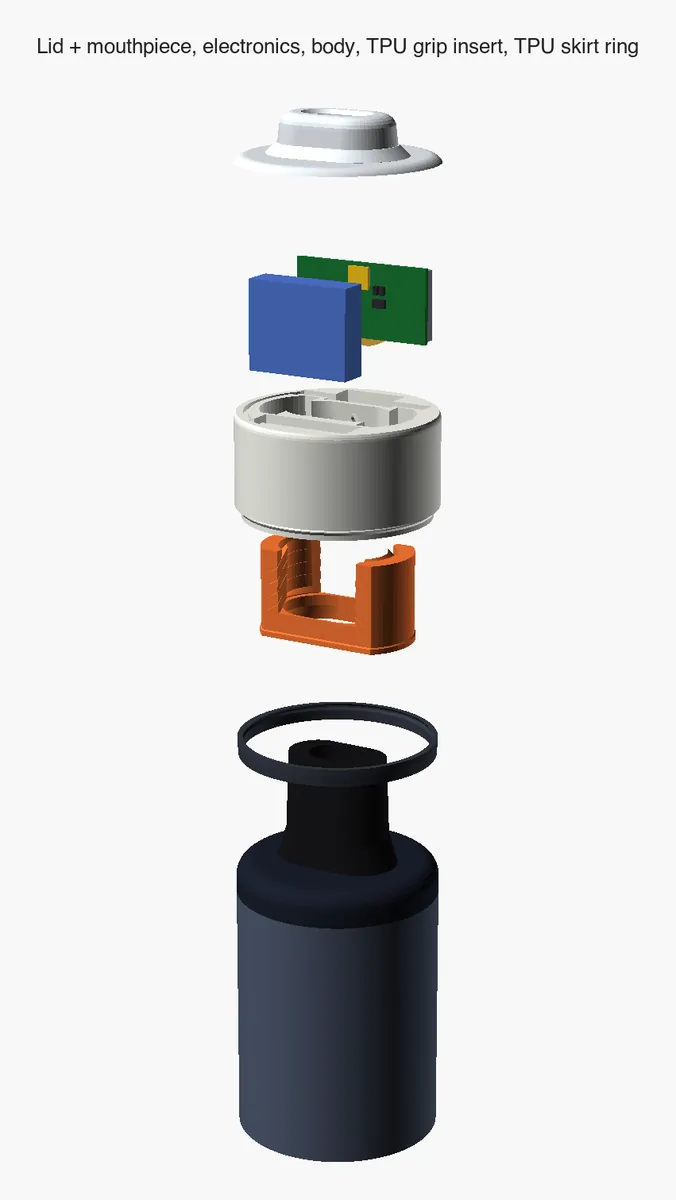
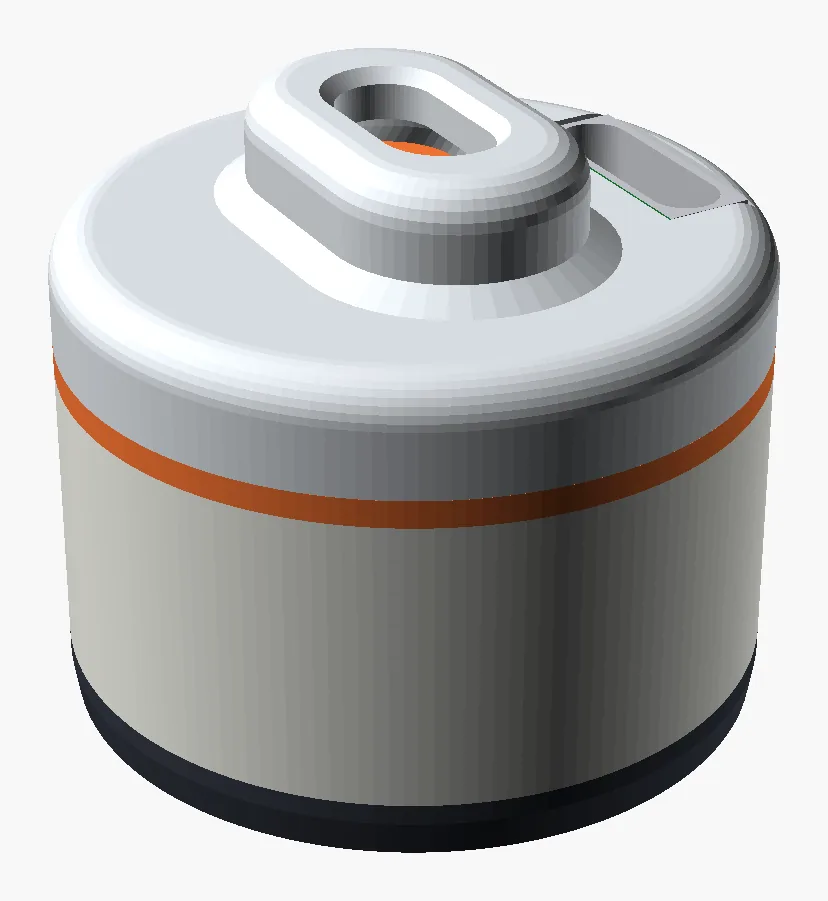
Day 8 One part set for all three vapes: a PETG body and lid, one TPU grip insert, one TPU skirt. Push on, pull off.
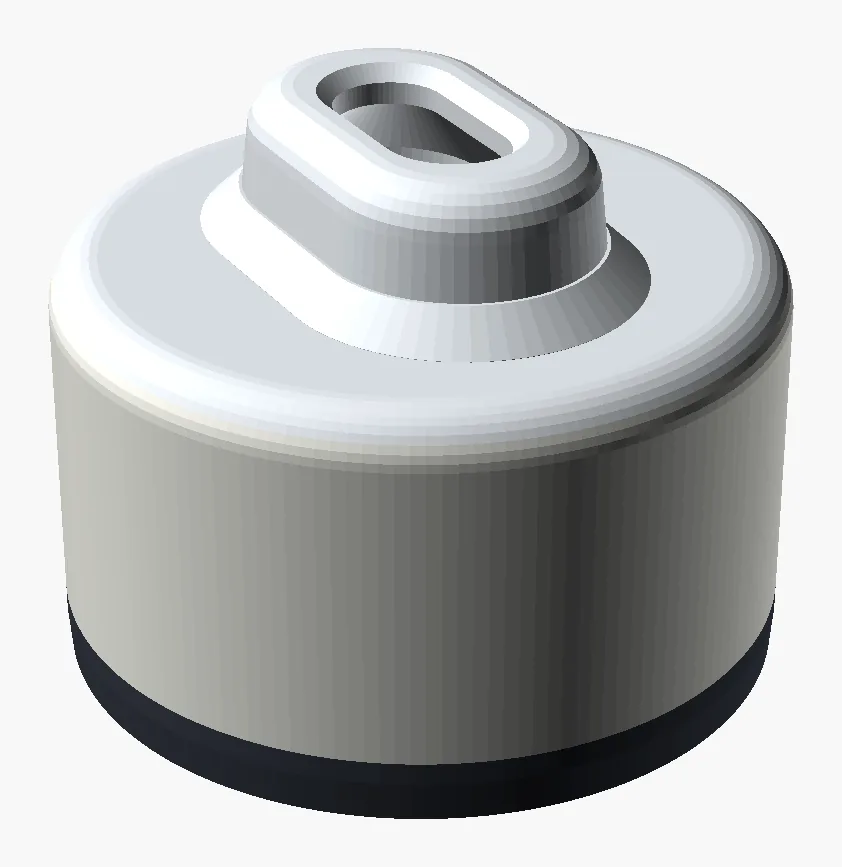
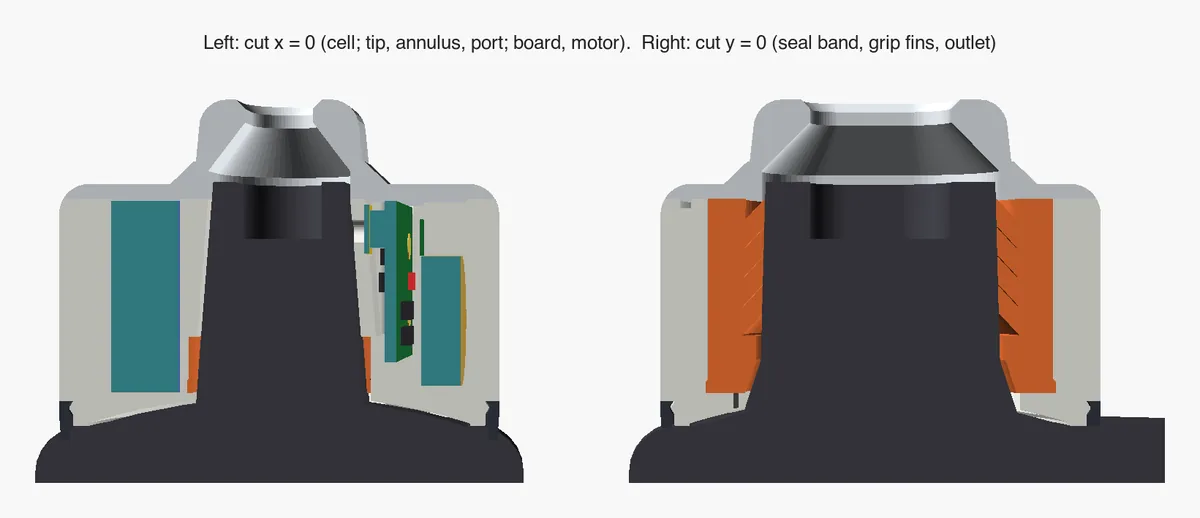
Day 11 The current pick: it grew to 25.4 mm for USB-C on the device and an electromagnet shutter. The round vape sticks out 0.7 mm.
Round 3: one shape for three vapes
On day 7 the problem got bigger. One vape is a sample size of one, and the brief says "fit on any vape". So the question became an optimisation: one shape that fits a wedge, a round and a rectangular vape sharing the same mouthpiece, stays put in a pocket, and stays small.
So three reference vapes went into CAD, all sharing the same flat-oval tip: the wedge (40 x 26 to 13 mm), a 24 mm round, and a 40 x 26 mm rectangle with the tip in the middle. A small script scores any design on each: clashes, height, and the plan margin, how far inside the vape's top outline it stays. Negative means it sticks out, and your pocket gets an edge to snag.
The first finding settled the shape. A 24 mm circle around the tip fits inside all three tops, and nothing much bigger does. Round 2.1's pod, so nice on the wedge, sticks out 8.91 mm past the round vape. The Cap sticks out 2.8. Anything universal has to be a centred puck about 24 mm across or less.
CircleFinder: what fits on all three vapes
Top-down view of three vape tops that share one flat-oval tip, 12.7 by 8.5 mm: a 40 mm wedge with the tip 13.4 mm from its round end, a 24 mm round vape and a 40 by 26 mm rectangle with the tip centred. Plan margin in mm on wedge, round and rect; positive stays inside the top, negative sticks out and can snag in a pocket. r2.1 pod (30.0 x 14.2 mm, +5.20 mm over the tip): Wedge +0.21, Round -8.91, Rect -0.10. r2.1 Cap (26.2 x 17.2 mm, +6.20 mm over the tip): Wedge -0.33, Round -2.80, Rect +4.40. Mushroom 22 (22.0 round mm, +5.00 mm over the tip): Wedge +1.87, Round +1.00, Rect +2.00. Pod3 (21.6 x 23.8 mm, +5.20 mm over the tip): Wedge +0.97, Round -0.60, Rect +1.10. Collar 23.4 (23.4 round mm, +4.40 mm over the tip): Wedge +1.17, Round +0.30, Rect +1.30. Collar 25.4 (25.4 round mm, +8.17 mm over the tip): Wedge +0.17, Round -0.70, Rect +0.30. A 24 mm circle centred on the tip fits inside all three tops; the round vape is the limit, so nothing much bigger does.
- Footprint
- 23.4 round
- Over the tip
- +4.4 mm
- Fits
- All three
- Worst margin
- +0.30 mm
- Margin on Wedge
- +1.17mm inside the top
- Margin on Round
- +0.30mm inside the top
- Margin on Rect
- +1.30mm inside the top
The pick: the lowest of the three, inside all three tops, motor inside.
Three new concepts all converged on that puck, each trading something different. The spec also gained a vibration motor that week: a small buzz when you reach a daily limit you set yourself. A 7 mm coin motor fits that job, though its size so far comes from secondary sources.6
- Mushroom: a 22.0 mm puck, +5.0 mm over the tip, the widest margins (+1.87, +1.00 and +2.00 mm on the wedge, round and rectangle). But the motor doesn't fit.
- Pod3: 21.6 x 23.8 mm, +5.2 mm. It sticks out 0.6 mm on the round vape and needs a different soft seat for each vape.
- Collar: a 23.4 mm ring around the tip, +4.4 mm, margins +1.17, +0.30 and +1.30 mm. The motor goes inside.
- Collar diameter
- 23.4 mm
- Added above the tip
- +4.4 mm
- Part set for all three vapes
- 1
- Tightest margin (the round vape)
- +0.30 mm
All from the CAD and its check script. Nothing has been measured on a printed part yet.
The collar won on day 8. It is the lowest of the three, and one part set fits all three vapes: a PETG body and lid, one TPU grip insert and one TPU skirt. The motor sits inside. The soft skirt's feathered lip rests on the vape's top, so pocket fabric has no edge to catch.
Inside a 23.4 mm circle there isn't much room beside a 12.7 x 8.5 mm tip: two crescents about 3.5 to 5 mm deep. So everything stands on end: the board up one flank, the cell up the other, the motor behind the board. Two TPU "ears" grip the tip's rounded ends with four rows of swept fins that bite harder the more you pull. Estimated hold: 16 to 37 N from the fins, plus anything from 0 to 55 N from the seal band, depending on how the TPU prints. To fit it, push it on. To take it off, pull.
What the collar gave up: the side-pod fit that suited the wedge so well, and 1.4 mm of diameter against the mushroom. It also left one open question that matters for a radio: the motor sits 1.16 mm from the Bluetooth module's antenna, against a 2 mm target.
Six weeks on a 30 mAh cell, on paper#
v0 is simple, and simple is hungry. Waking the processor 25 times a second costs about 37 microamps on its own, and the BMP280 sampling at 25 Hz about 70 more. The estimate for the whole thing idling in a pocket is about 125 uA (likely 95 to 170). On a 50 mAh cell that is roughly 13 days, which already clears the brief's "at least a week".
The collar board does it differently. Its BMP581 sensor can watch the pressure on its own at 10 Hz and only wake the processor when a reading leaves a window of plus or minus 120 Pa, or every 30 seconds to re-centre that window.7 The processor sleeps through everything that isn't a puff. The design-case estimate comes to 23.9 uA. On a 30 mAh cell, with 85 percent of it usable, that is about 44.5 days: roughly six weeks, and 37 to 61 days across the optimistic and pessimistic cases.
The limit buzz barely registers: a half-second buzz at 85 mA is about 0.012 mAh. Charging goes through a TI BQ25180 set to 30 mA, which is 1C for this cell: about 1.3 hours from flat (also an estimate).8 The two biggest terms in the budget, the sensor's idle current and the length of each Bluetooth advertising burst, are derived from datasheets, not measured. A power profiler on the first board will tell us how close we got.
PowerBudget: where the microamps go
Estimated power budget for the collar board: 24.0 microamps on average, about 44.2 days per charge on a 30 mAh cell (85 percent of it usable). Biggest draws: pressure sensor 8.50 microamps, asleep and standby 6.64 microamps, bluetooth advertising 4.80 microamps.
Estimate per charge on 30 mAh, about 6.3 weeks. Average draw 24.0 uA.
Assumes 85% of the cell is usable before cut-off (25.5 mAh), the docs' own unsourced estimate.
| Source | uA | Share |
|---|---|---|
| ISP1807 asleep (256 kB RAM kept)datasheet: 1.5 uA + 30 nA per 4 kB block | 3.42 | 14% |
| BQ25180 charger, battery quiescentTI datasheet typical | 3.00 | 12% |
| TPS7A02 LDO quiescent25 nA, TI figure | 0.03 | 0.1% |
| Battery divider (10 M + 10 M)Ohm's law at 3.8 V | 0.19 | 0.8% |
| Re-centring the wake window every 30 sestimate: about 4 uC per wake | 0.13 | 0.5% |
| BMP581 watching at 10 Hzderived: standby 1.0 uA + 0.75 uC per sample | 8.50 | 35% |
| Advertising every 2 sestimate: 1.5 ms at 6.4 mA per event (9.6 uC) | 4.80 | 20% |
| Phone sync, 4 a dayestimate: 4 sessions of 10 s at 7.5 mA | 3.50 | 15% |
| Puffs, 300 a dayestimate: about 3 s at 25 Hz plus 10 FIFO reads per puff | 0.19 | 0.8% |
| LED blink per puffestimate: 30 ms at 1 mA | 0.10 | 0.4% |
| Limit buzz, 0 a dayestimate: 0.5 s at 85 mA (motor current unverified) | 0 | 0% |
| Shutter, 2 switches a dayestimate: 150 mA for 50 ms (the doc's upper end) | 0.17 | 0.7% |
| Total | 24.0 | 100% |
The doc's design case (r2/power-budget.md, design case; Battery life, 30 mAh) is 23.9 uA and 44.5 days without the shutter; the design notes round it to about 6 weeks. Nothing here has been measured yet: the first boards and a current meter come next.
A board the size of a fingernail#
The collar's board is 16.7 x 8.6 mm, 4 layers and 0.6 mm thick, with gold (ENIG) finish. It stands on its edge beside the vape's tip and carries almost everything:
- an Insight SiP ISP1807 module, an nRF52840 with its antenna and crystals packed into 8 x 8 x 1 mm;9
- the BMP581 pressure sensor, facing the tip and pressing through a thin gasket onto the 1.0 mm port;
- a BQ25180 charger smaller than a grain of rice (1.6 x 1.1 mm) and a TPS7A02 3.0 V regulator that is 1 mm square;10
- a Panasonic EVQ-P7 side-push switch, 3.5 x 2.9 x 1.35 mm, pressed when ExCap is seated on a vape, so it knows when it's on and when it's off;11
- an LED behind a 0.4 mm plastic skin, and test pads for a pogo-pin programming jig.
One more constraint shaped the board: Batch 01 gets assembled by hand, so every solder joint is a chance to fail. Connectors beat wires. So one low-profile flex connector carries everything that leaves the board, and the expected hand soldering per device is two joints: the cell's leads. The design follows JLCPCB's published rules (0.10 mm traces and gaps, 0.15 mm vias),12 with no copper at all in the 4 mm under the antenna. Supply-chain reality already showed up: the regulator lists a 26-week factory lead time, and the board house had 8 of the sensors in stock.
On day 10 the KiCad schematic came out ERC clean, alongside a custom footprint library for the parts the stock libraries don't have. Laying out the copper is phase 2, and it is happening now.
Why the collar grew to 25.4 mm
The round 2 plan charged ExCap on a small printed dock through two pogo pads. A dock is one more thing to lose, so the spec moved to a plain USB-C port on the device, and a USB-C receptacle is about 9 x 7 x 3 mm, which doesn't fit inside 23.4 mm. Neither did the shutter, which gets its own section below. On day 10 we took the bigger option: a 25.4 mm collar, grown to fit both USB-C on the device and the shutter.
- The USB-C port stands upright beside the mouthpiece, and the plug goes in from above.
- It is cleanable: the parts the vapor touches come off and rinse, and the electronics sit in a sealed dry core under a TPU cover, with no glue anywhere.
- The motor moved behind the cell, 16 mm from the antenna.
- The cost: the round vape now sticks out 0.7 mm, a trade we accepted, and the collar rises 8.17 mm over the tip instead of 4.4. The cleanable cover takes 0.8 mm of that and the shutter about 3.
Reality bites: the print that didn't fit#
On day 11 the collar's body and grip insert came off the printer, and the model met the physical world. It was far too tight. The insert was hard to push into the body. The collar wouldn't go on the vape. The insert's thin flat walls had bowed inward into an hourglass. Even half an insert on its own was tight on the real tip.
The likely reason: the real tip is bigger than the photos suggested (remember that short axis of 8.5 mm, give or take 1.5), and the press fit was buckling the 0.5 mm walls. The 1-to-2 mm versus 0.2 mm problem had come to collect.
The first fix, the same day, was a ruler you print. The tip gauge is two bars of slots. The W bar steps the slot width from 7.00 to 10.00 mm in quarter-millimetre steps; the L bar steps the length from 11.50 to 14.00. Slide each slot down over the tip, and the smallest one that goes on without forcing is your size. Because the same printer makes the holes, the answer already includes how small that printer prints holes, which is exactly what the insert needs to know. It prints in about ten minutes.
The rest of the fixes landed before the day was out:
- the insert's press fit in the body became a slip fit;
- fin interference on the tip came down from 0.45 to 0.30 mm a side;
- a single fit knob,
cl_fit, in millimetres a side (plus is looser), moves the seal band and the fins together; it defaults to +0.35 until the gauge numbers arrive; - a fit ladder of five inserts at -0.3, 0, +0.35, +0.5 and +0.65, marked with 1 to 5 notches, covers a real tip up to about 1.3 mm bigger than modelled;
- a size ladder, S, M and L (the tip +0, +0.2 and +0.4 mm a side), each printed with inserts at two fits.
FitLadder: from photo guesses to a fit you can feel
Photos measure the vape tip to 1 to 2 mm (short axis 8.5 plus or minus 1.5), but an insert that grips and seals needs about 0.2 mm. So we printed five grip inserts at cl_fit -0.3, 0, +0.35, +0.5 and +0.65 mm a side, marked 1 to 5 notches, plus S, M and L bodies for a tip 0, 0.2 and 0.4 mm a side bigger. The fins aim for 0.30 mm of interference a side; the first print, at 0.45, would not go on. Now: real tip 0.00 mm a side over the estimate, size S, cl_fit +0.35: fins 0.05 clear, band 0.30 gap. Slips on.
The fins at most kiss the tip and the band has a gap: it goes on easily but doesn't seal yet.
- Fins, a side
- -0.05mm clear
- Seal band
- -0.30mm gap: leaks
- Body room
- +0.20mm of the 0.2 left
Grip (estimate): fins 0 N, no band. Modelled, not measured: the design notes give 12 to 26 N for the fins at the 0.30 target, and the fin force scales with how far they reach in.
The body's own 0.2 clearance round the tip doesn't follow cl_fit. A tip more than 0.2 a side bigger needs the M or L body.
cl_fit knob to see how the grip insert loosens or tightens, then compare the printed fit ladder (-0.3, 0, +0.35, +0.5 and +0.65 mm) and the S, M and L size ladder that bracket the real tip.© ExHale LabsThe printer has opinions
On day 12 came the second reality check, on the 25.4 mm parts: giant overhangs, designed as if the printer had supports. It doesn't. An FDM printer lays each layer of molten plastic on the one below, so a wall that leans out too far droops, while a short flat span between two walls can bridge across. That same day the rule became code. printcheck.py reads every part in the orientation it will print, finds each downward-facing patch and fails the part if a flat ceiling is wider than 6 mm in both directions, or if a sloped overhang flatter than 45 degrees covers more than 2 mm2. The build scripts now refuse to finish when any part fails.
A guideline is easy to forget late at night. A gate isn't.
The redesign that closed out day 12 got every part through it with no supports. The body and the top cap now print flat on the bed. Roofs slope at 40 degrees, the grip fins at 42, and groove flanks at 30. A separate TPU boot around the USB-C port turned out to be redundant, because the TPU cover already seals around it, so 10 printed parts became 9. The steeper fins cost some grip on paper: about 12 to 26 N at the target fit, plus the seal band.
OverhangCheck: the no-support rule, in your hands
The printcheck rule for printing with no supports: nothing flatter than 45 degrees from vertical, unless it is a flat bridge of 6 mm or less; sloped overhangs only get through as patches up to 2 square mm. Collar presets: grip fins at 42 degrees pass, the cap's chamber roof at 40 passes, the skirt's groove flanks at 30 pass, the old 7.6 mm flat roof fails, and the 5.7 mm bridge round the plate passes. Now: 42 degrees from vertical: PASS.
42 degrees from vertical: each layer sits on the one below.
The rule: nothing flatter than 45 degrees unless it's a bridge of 6 mm or less. printcheck.py fails the build on anything else (a sloped patch over 2 mm2 too), so every part prints with no supports.
Grip insert fins (TPU, band down)
A lock you can still take off#
The limit buzz is a nudge. During round 3 we looked at something firmer, and the answer turned out to be sitting in the design already: ExCap owns the air path. Every draw passes through it. So it can make the next puff take a deliberate step, once you hit a limit you set yourself.
There are two ways to do that:
- Close it. A shutter over the outlet.
- Bypass it. Open a side vent, so you draw room air and the vape's own draw sensor never sees enough vacuum to fire. A vent fails safe: if it gets stuck, the vape just works as normal.
Either way it needs a latching actuator, one that only uses energy when it flips and holds either position for free. Miniature latching valves exist, switching on 5.5 to 23 mJ a time,13,14 but off-the-shelf micro-valves pass far too little air for a draw. So it has to be custom. The first attempt, on day 9, moved a printed plate with two shape-memory alloy wires. On day 10 a small electromagnet replaced them: simpler to drive, and it holds either position for free. The requirement that made it feasible is a modest one. The shutter is a speed bump, not a vault:
It doesn't have to seal perfectly, just enough to be annoying.
The design requirement
How the shutter works
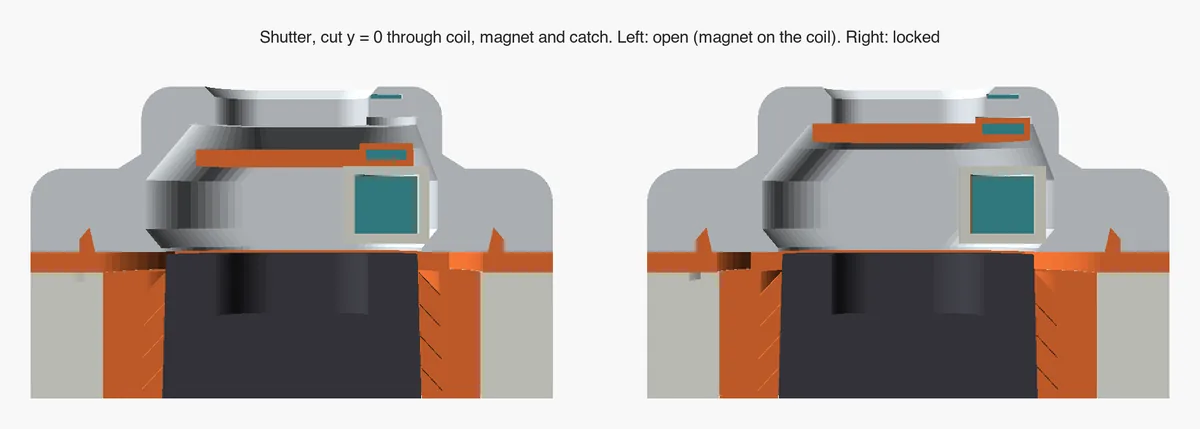
- A tiny drum-core coil, 3.0 x 2.8 mm, sits in a sealed printed housing just above the vape's tip.
- Above it, a flat TPU plate carries a 2 x 0.5 mm N52 disc magnet, sealed into the plastic during the print.
- In the roof of the cap, a 1.5 mm disc of 430 stainless steel acts as a catch. It's magnetic, and it doesn't rust.
- Open, the plate rests on the coil housing. Locked, it rises 1.25 mm and closes against the roof around the 7.5 x 3.6 mm outlet. It sits on the vape side, so drawing on it presses it harder shut.
- To switch, a small H-bridge sends about 150 mA through the coil for 20 to 50 ms, up to about 28 mJ per switch. One polarity pushes the magnet up to lock; the other pulls it down to unlock. In between, the magnet holds itself to the coil's core or to the catch, using no power at all.
The forces are modelled, not measured. To lock, the coil pushes with about 101 mN against the 38 mN that holds the magnet open, a margin of 2.67. To unlock, it pulls with 8.1 mN against a 5.3 mN hold, a margin of 1.54. Both clear the 1.5 we were aiming for.
The weak spot is that locked hold. 5.3 mN on a 50 mg plate is about an 11 g knock, so a sharp tap could open it. If that happens, the plan is that the firmware sees a puff while it should be locked and pulses it shut again, and the draw itself helps it close. One counter-intuitive call along the way: a 2 x 0.5 mm magnet beat a 2 x 1 mm one. Halving the magnet halves the coil's force, but it quarters both holds, so both margins get better.
ShutterSection: open and locked
Cross-section of the 25.4 mm collar's air path with the electromagnet shutter. The vape tip sits at the bottom. A sealed PETG coil carrier on the dry side hangs 0.5 mm over the tip's rim and holds a 3.0 by 2.8 mm coil. Above it a 0.8 mm TPU plate carries a 2 by 0.5 mm N52 magnet, guided by ribs. Open, the plate rests on the carrier and air flows round it and out through the 7.5 by 3.6 mm outlet in the roof. Locked, the plate has risen 1.25 mm against the roof round the outlet, where a 1.5 by 0.2 mm 430 stainless catch disc sealed in the roof holds it, and a draw only presses it harder shut. A pulse of about 150 mA for 20 to 50 ms, up to about 28 mJ, switches it; one polarity locks, the other unlocks. Modelled forces, not measured: lock push 101 mN against a 38 mN hold, margin 2.67; unlock pull 8.1 mN against a 5.3 mN hold, margin 1.54; the target is 1.5. It comes off by hand: a commitment aid, not a real lock. Now showing: open.
- Pulse
- about 150 mA
- For
- 20 to 50 ms
- Energy
- up to 28 mJ
Unlock pulse: the other polarity pulls the magnet back down onto the coil carrier. The plate rests there, open. Energy is only spent when it switches.
101 mN of coil against 38 mN of hold. The hold is the magnet sticking to the coil's core.
8.1 mN of coil against 5.3 mN of hold. The hold is the magnet on the catch. Both clear 1.5.
Comes off by hand: a commitment aid, not a real lock.
What it is, and what it isn't
- A commitment aid, not a real lock. ExCap comes off by hand. Pull it off and the vape works as it always did. The shutter makes the next puff a deliberate decision, nothing more.
- It must never strand you. The firmware has to open the shutter before the battery runs flat.
- It is optional. The buzz comes first. In the CAD the shutter is a switch that is off by default, and the 23.4 mm collar builds exactly as before without it.
- It costs something. The coil housing's arm crosses the grip insert, so the insert no longer lifts out for cleaning; it gets wiped in place. How much a printed flat plate leaks is unknown.
As far as our search went, this only turned up in patents. We couldn't find a product on the market that does it, which is exciting and also a reason to be careful about every number above until a real one has been built and tested.
Where we're at, and what's next#
The quest board, morning of 14 October
Quest log: ExCap
8 of 16 done, 2 in progress
Done8
- Done: Measure the vape from photosGood to 1 to 2 mm, with an AirPods Pro case for scale
- Done: v0: CAD, firmware, Web Bluetooth test page93 host-test checks and 21 test-page tests passing
- Done: Rounds 2 and 2.1: the name ExCap, the Cap, the side pod
- Done: Round 3: the collar pickedOne 23.4 mm puck for three reference vapes, +4.4 mm over the tip
- Done: Custom board: KiCad schematic, ERC clean16.7 x 8.6 mm, 4 layers
- Done: Electromagnet shutter designedForces modelled, not tested
- Done: First collar print: far too tightTip gauge, slip fit, a fit ladder and an S/M/L size ladder
- Done: printcheck gate and a no-support redesign10 printed parts became 9
Now2
- In progress: Measure the real tip with the gaugeThen print the S/M/L size ladder
- In progress: Board layout (phase 2)
Next6
- Not started: Breadboard rig on a real vapeTune the thresholds from live pressure
- Not started: Shutter on the benchDoes a printed plate seal enough?
- Not started: The first boards
- Not started: Antenna range testThe motor sits close to the antenna
- Not started: The app side: pairing and auto-logged puffsNeeds a store build; screens get mocked up first
- Not started: Batch 01A small hand-built run. Waitlist at /excap
As of the morning of 14 Oct: nothing has been ordered yet, and the firmware hasn't run on a real device yet.
Here's the state of play after twelve days. Nothing has been ordered yet, and the firmware hasn't run on a real device. Right now we're measuring the real tip with the gauge and printing the size ladder, and laying out the board.
Next, in roughly this order:
- A breadboard rig on a real vape: a XIAO, a BMP581 breakout and a coin motor, about AUD 90 of parts, streaming live pressure so the detector's thresholds get tuned on real draws instead of synthetic ones.
- The first boards, from the layout that is in progress now.
- An antenna range test: signal strength at 1, 3 and 5 m, with and without the motor, because there is metal close to the antenna in both collar sizes.
- The app side: pairing and puffs that log themselves. It needs a store build rather than an over-the-air update, and every new screen gets mocked up first.
- Batch 01, a small hand-built run.
That is a long list of unknowns, and it is the fun kind: every item on it gets answered by building something. A day that starts with photos of a vape and ends with a printed ruler for measuring it properly is a good day in a hardware lab.
If you want one of the first ones, join the ExCap waitlist. Batch 01 will be a small hand-built run, and the price is still to be decided. With luck, dev log #2 will have real pressure traces in it.
Smart vape cap: questions and answers#
What is ExCap?
ExCap is a tiny Bluetooth puff counter that fits on the top of a vape and logs each puff to the ExHale app automatically, so you don't have to tap for every puff. It is a prototype from ExHale Labs, still in development: the current design is a round collar about 23 to 25 mm across that sits around the mouthpiece, with a pressure sensor, a Bluetooth chip, a small rechargeable cell and a vibration motor inside.
How does ExCap count vape puffs?
You draw through ExCap's own mouthpiece, and a soft insert seals onto your vape's tip, so the vape still fires as normal. Drawing pulls the air path below room pressure, by about 3 kPa in research measurements, and a pressure sensor beside the air channel feels that drop. The firmware counts a puff when the pressure falls more than 120 Pa below a slowly moving baseline and stays down for at least 250 ms. Doors, cars, lifts, short blips and blowing into it are filtered out. Each puff is stored with its start time, duration and strength.
Will ExCap fit my vape?
That is the goal. The current collar design was scored in CAD on three reference vapes that share the same flat-oval mouthpiece: a wedge-shaped disposable, a 24 mm round vape and a 40 x 26 mm rectangular one, and one part set fits all three. Other mouthpiece shapes would need their own soft grip insert. The fit is still being tuned on real prints, and if you join the waitlist you can tell us what you vape.
How long does the battery last, and how does it charge?
The estimate is about six weeks per charge on a 30 mAh cell, worked out from datasheets rather than measured, because the custom board doesn't exist yet. The latest design charges over a USB-C port on the device itself, and a full charge is estimated at a little over an hour.
Does ExCap track my location or record audio?
No. ExCap has no microphone, no camera and no GPS. It records puff counts and times (with each puff's duration and pressure drop) and sends them to your ExHale app. Nothing else.
Does ExCap work when my phone isn't nearby?
Yes. ExCap stores puffs on the device itself, about two weeks' worth at 150 puffs a day in the prototype firmware, and syncs them to the app the next time your phone connects. Puffs taken while the phone is away keep their real times.
What does the ExCap shutter do?
It is an experimental, optional feature in one version of the design. When you reach a daily limit you set yourself, a tiny electromagnet can flip a small plate that closes ExCap's outlet, so the next puff takes a deliberate step. It is a commitment aid, not a real lock: ExCap comes off the vape by hand at any time, and the vape then works exactly as before. The firmware must open the shutter before the battery runs flat. All of its forces are modelled so far, not tested.
When can I get one, and is it a medical device?
There is no release date or price yet. Batch 01 will be a small hand-built run, and you can join the waitlist on the ExCap page to hear first. ExCap is not a medical device and makes no health claims: it counts puffs so you can see your own habit clearly in the ExHale app.
References#
- Adams, Mandel, Shats, Robin and Choudhury. PuffPacket: A Platform for Unobtrusively Tracking the Fine-grained Consumption Patterns of E-cigarette Users. CHI 2020. doi 10.1145/3313831.3376373. doi.org/10.1145/3313831.3376373
- PuffPacket: open-source hardware and software (2020). github.com/PuffPacket/PuffPacket
- Seeed Studio: XIAO nRF52840 wiki (specifications, pin map, charger, standby current). wiki.seeedstudio.com/XIAO_BLE/
- Nordic Semiconductor: nRF52840 Product Specification v1.5 (copy hosted by Seeed). files.seeedstudio.com/wiki/XIAO-BLE/nRF52840_PS_v1.5.pdf
- Bosch Sensortec: BMP280 digital pressure sensor datasheet (BST-BMP280-DS001). www.bosch-sensortec.com/media/boschsensortec/downloads/datasheets/bst-bmp280-ds001.pdf
- eeNews Europe: a coin vibration motor only 7 mm wide and 2.1 mm thick (secondary source for the motor size). www.eenewseurope.com/en/coin-vibration-motor-is-only-7mm-wide-2-1mm-thick/
- Bosch Sensortec: BMP581 barometric pressure sensor datasheet (BST-BMP581-DS004). www.bosch-sensortec.com/media/boschsensortec/downloads/datasheets/bst-bmp581-ds004.pdf
- Texas Instruments: BQ25180 linear battery charger datasheet. www.ti.com/lit/ds/symlink/bq25180.pdf
- Insight SiP: ISP1807 Bluetooth module (nRF52840) datasheet. www.insightsip.com/fichiers_insightsip/pdf/ble/ISP1807/isp_ble_DS1807.pdf
- Texas Instruments TPS7A0230 3.0 V LDO (Digi-Key listing). www.digikey.com/en/products/detail/texas-instruments/TPS7A0230PDQNR/11502201
- Panasonic Industry: EVQ-P7 series light-touch side-push switches. na.industrial.panasonic.com/products/electromechanical/switches/light-touch-tactile-switches/series/79247
- JLCPCB: standard rigid PCB capabilities. jlcpcb.com/capabilities/pcb-capabilities
- The Lee Company: LHL Series magnetically latched solenoid valve (PDS 50). www.theleeco.com/uploads/2021/11/PDS-50-2019-10-LHLSeriesSolenoidValve.pdf
- The Lee Company: ultra-miniature latching 2-port HDI solenoid valve (PDS 135). www.theleeco.com/uploads/2021/11/PDS-135-2020-06-UltraMiniatureLatching2-PortHighDensityInterface-HDI-SolenoidValve.pdf
© 2026 ExHale Labs. Text, figures and simulation data. All rights reserved.